Sunday 16 July 2017

What is DDL, DML, DCL and TCL?

DDL
A data definition language or data description language (DDL) is syntax similar to a computer programming language for defining data structures, especially database schemas.
CREATE
To create database and its objects like (table, index, views, store procedure, function and triggers)
ALTER
Alters the structure of the existing database and its objects
DROP
Delete objects from the database
TRUNCATE
Remove all records from a table, including all spaces allocated for the records
RENAME
Renames an object
COMMENT
Add comments to the data dictionary
DML
DML stands for Data Manipulation Language to retrieve and manipulate data in a relational database, and includes most common SQL statements such SELECT, INSERT, UPDATE, DELETE etc, and it is used to store, modify, retrieve, delete and update data in database.
Data manipulation language comprises the SQL data change statements, which modify stored data but not the schema.
Data manipulation languages have their functional capability organized by the initial word in a statement, which is almost always a verb. In the case of SQL, these verbs are:
SELECT
Retrieve data from the database.
INSERT
Insert data into a table
UPDATE
Updates existing data within a table
DELETE
Delete all records from a database table
MERGE
UPSERT operation (insert or update)
CALL
Call a PL/SQL or Java subprogram
EXPLAIN PLAN
Explain access path to data
LOCK TABLE
Control concurrency
DCL
DCL stands for Data Control Language used to control access to data stored in a database.
GRANT
Providing  user with set of roles to access database
REVOKE
Withdraw user’s access privileges already given
TCL
TCL is short name of Transaction Control Language which deals with transaction within a database. TCL statements are used to manage the changes made by DML statements. It allows statements to be grouped together into logical transactions.
COMMIT
Saves the work done
ROLLBACK
Restore database to original since the last COMMIT
SAVEPOINT
Identify a point in a transaction to which you can later roll back
SET TRANSACTION
Change transaction options like isolation level and what rollback segment to use

Sunday 9 July 2017

Cut command usage and examples

Cut 
Cut is used for text extraction. Like its name it cuts given number of characters or field from specified file. The cut command assumes that the fields are separated by tab character. If the fields are delimited by some other character, then option –d is used to set delimiter.

Syntax
cut [options] file_name

Options
-b Select only the bytes from each line as specified in LIST.
-c Select only the characters from each line as specified in LIST.
-d Used for the field delimiter.
-f Select only mentioned fields on each line; also print any line that contains no delimiter character.
--complement Select All Fields Except the Specified Fields.
-s
Do not print lines not containing delimiters.
--output-delimiter=STRING Set STRING as the output delimiter string.

LIST specifies a byte/character, a set of bytes/characters, or a range of bytes/characters. Each LIST is made up of an integer, a range of integers, or multiple integer ranges separated by commas.

c Nth byte, character, or field, counted from 1.
N- From the Nth byte, character, or field, to the end of the line.
N-M From the Nth to the Mth byte, character, or field (inclusive).
-M From the first to the Mth byte, character, or field.

Let us consider below skills.txt file for understanding cut examples.

cat skills.txt
Barry likes coding.
Henry like to travel.
Joseph is an dancer.
Richi is an actress.
Peter was journalist, now he is a manager.   
     
Example               

Command to display specific column from a file

cut -c3 skills.txt 
r
n
s
c
t

The above example displays third character from each line of the file skills.txt.

Command to display specific range of column from a file

cut -c1-4 skills.txt
Barr
Henr
Jose
Rich
Pete

The above example displays character from range 1 to 4 from each line of the file.

Command to display columns from a file beginning from specified Start Position

cut -c4- skills.txt
ry likes coding.
ry like to travel.
eph is an dancer.
hi is an actress.
er was journalist, now he is a manager.

The above example displays starting from 4th column till the last column of each line of the file.

Command to display columns from a file until specified End Position

cut -c-7 skills.txt
Barry l
Henry l
Joseph
Richi i
Peter w

The above example displays columns from 1st to the 7th column of each line of the file.

To display specific field from a file

When we want to display a whole field, need to use option -f and -d. The option -f specifies which field you want to extract, and the option -d specifies the field delimiter that is used in the input file.

cut -d' ' -f2 skills.txt
likes
like
is
is
was

The above example displays the second field in each line by treating the space as delimiter. 

To display multiple fields from a file

We can print more than one field by specifying the position of the fields in a comma delimited list.

cut -d' ' -f2,3 skills.txt
likes coding.
like to
is an
is an
was journalist,
The above example displays 2nd and 3rd fields only. 

To display range of fields from a file

cut -d' ' -f1-2 skills.txt
Barry likes
Henry like
Joseph is
Richi is
Peter was

The above example prints the first and second fields.

To display fields from beginning to the end field specified

In order to print the first two fields, you can ignore the start position and specify only the end position.

cut -d' ' -f-3 skills.txt
Barry likes coding.
Henry like to
Joseph is an
Richi is an
Peter was journalist,

The above example prints up to 3rd field. 

Display fields from start field specified till the ending.

To print the fields from second fields to last field, you can remove the last field position.

cut -d' ' -f2- skills.txt
likes coding.
like to travel.
is an dancer.
is an actress.
was journalist, now he is a manager.

The above example displays fields from 2nd to the last field of each line of the file.

Display fields only when line contains the delimiter

cut -d'#' -f2- skills.txt
Barry likes coding.
Henry like to travel.
Joseph is an dancer.
Richi is an actress.
Peter was journalist, now he is a manager.

In the above example, we have specified the delimiter as #, and cut command displays the whole line, even when it doesn’t find any line that has # as the delimiter.

We need to use -s option to display the lines that contains the specified delimiter.
cut -d'#' -s -f2- skills.txt

No output shown. 

Display all fields except the specified fields

In order to hide certain field use option --complement.

cut -d' ' --complement -f2 skills.txt
Barry coding.
Henry to travel.
Joseph an dancer.
Richi an actress.
Peter journalist, now he is a manager.

The above example displayed all the fields except 2nd field from the file.
For Display changing the output delimiter

By default the output delimiter is same as input delimiter that we specify in the cut -d option. To change the output delimiter use the option --output-delimiter as shown below.

cut -d' ' --complement -f2 --output-delimeter='|' skills.txt
Barry|coding.
Henry|to|travel.
Joseph|an|dancer.
Richi|an|actress.
Peter|journalist,|now|he|is|a|manager. 

The above example has the input delimiter as space , but the output delimiter is replaced by | (pipe).
When we set the –output-delimiter value to $’\n’ then each and every field of the cut command output is displayed in a separate line.

TIPS

The entire file is displayed when you don’t specify a number before or after the ‘-‘.

When calling cut command, use the -b, -c, or -f option, but only one of them.

If no FILE is specified, cut reads from the standard input.

Saturday 8 July 2017

crontab command usage and examples

Cron 
Cron is driven by a crontab (cron table) file, a configuration file that specifies shell commands to run periodically on a given schedule. Cron is a daemon which runs at the times of system boot from /etc/init.d scripts. If needed it can be stopped/started/restart using init script or with command service crond start in Linux systems. The software utility Cron is a time-based job scheduler.

Daemon 
A daemon is a style of program that runs in the background, instead of underneath the direct management of a user, waiting to be activated by the occurrence of a selected event or condition.
There are 3 basic types of processes in Linux: Interactive, Batch and Daemon. Interactive processes are run interactively by a user at the instruction (i.e., all-text mode). Batch processes are submitted from a queue of processes and aren't related to the command line; they're compatible for performing tasks when system usage is low.

Crontab 
Crontab is the program used to edit, remove or list the tables. It typically automates system maintenance or administration by maintaining crontab files for individual users. The crontab files are stored where the lists of jobs and other instructions to the cron daemon are kept. Users can have their own individual crontab files located in /var/spool/ and often there is a system-wide crontab file that only system administrators can edit. The origin of the name cron is from the Greek word for time (chronos). cron is most suitable for scheduling repetitive tasks.

Cron jobs
Cron jobs can be allowed or disallowed for individual users, as specified in the files cron.allow and cron.deny, located in the directory /etc. If the cron.allow file exists, a user must be listed there to be allowed to use a given command. If the cron.allow file does not exist but the cron.deny file does, then a user must not be listed there in order to use a given command. If neither of these files exists, only the superuser will be allowed to use a given command

Syntax
crontab [options]

Options
-u Append the name of the user whose crontab is to be changed. If this option is not given, crontab examines "your" crontab, i.e., the crontab of the person executing the command.
-l Display the current crontab.
-r Remove the current crontab.
-e Edit the current crontab, using the editor specified in the VISUAL or EDITOR environment variables.
-i Same as -r, but gives the user a Y/N prompt before actually removing the crontab.


Fields with allowed values


   minute

0-59

   hour

   0-23

   day of month

   1-31

   month

   1-12

   day of week


   0-7 (0 or 7 is Sunday)

There are special cases in which instead of the above 5 fields you can use @ followed by a keyword:

Installing crontab from a cron file


Instead of directly editing the crontab file, you can also add all the entries to a cron-file first. 
# crontab -u flash -l
no crontab for flash

cat cron-file.txt
@daily /home/flash/ gotoearth38

# crontab cron-file.txt

# crontab –u flash -l
@daily /home/flash/ gotoearth38

This will install the cron-file.txt to your crontab, which will also remove your old cron entries. So, be careful while uploading cron entries from a cron-file.txt.


Viewing other user’s crontab entries 


# crontab -u batman -l
00 12  * * * /home/batman/check-engine-status

Examples
Running a job every 15 Minutes.

*/15 * * * * /home/ batman/check-engine-status

Running a job every minute.


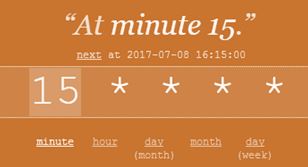
Running a job every 15th minute of hour daily.
cron at particular minute

Running job at 09: 15 daily.cron at specific time

Running  job at 09: 15  on 11th of every month.
cron at specific day of month

Running  job at 09: 15  on 11th July.
cron at specific month

Running  job at 09: 15  on every Sunday in  July.
cron at specific day